
Last Updated on November 15, 2023
Farmhouse sinks are a popular choice for vintage-inspired style kitchen renovations. With their large, deep basins and exposed front aprons, they instantly add charm and character to any kitchen. Research shows that 29% of people want to remodel their kitchen, either because their old kitchen had deteriorated or broken down. But installing a farmhouse sink in a small kitchen can be tricky because it takes up more space than a standard kitchen sink.
If you have your heart set on a farmhouse sink but are limited on space, don’t worry! With some smart planning and design, you can make a farmhouse sink work in even the tiniest kitchen. This article will provide quick and easy tips to help you install a farmhouse sink in a small kitchen while maximizing your available space.
1. Measure Your Space
Before selecting a farmhouse sink, carefully measure your existing cabinet and countertop space.
- Farmhouse sinks are generally available in widths ranging from 30 to 48 inches.
- For a small kitchen, a 30-inch wide single-bowl sink is likely the best option.
- Measure the interior width of your sink cabinet and allow for 3 inches of clearance on each side when determining the maximum size sink that will fit.
This upfront planning will ensure your new sink will actually fit in the allotted space.
2. Opt for a Single-Bowl Design
One of the easiest ways to save space with a farmhouse sink is to choose a single-bowl design instead of a double-bowl.
- Choosing a single-bowl sink instead of a double-bowl sink can save you a foot or more of counter space.
- Single-bowl sinks come in all styles, and a farmhouse-style sink like the one shown here still feels capacious.
Stick with a single basin, and you’ll have more room for meal preparation and entertaining.
3. Install in a Corner
Placing your farmhouse sink in the corner of your kitchen is a great way to free up precious counter space.
- Installing the farmhouse sink in a corner can maximize counter space.
- The corner location still allows for an attractive exposed front apron.
- Make sure to follow the manufacturer’s instructions to ensure proper installation and drainage.
This clever positioning will help your small kitchen feel instantly more spacious.
4. Under Sink Storage Solutions
While farmhouse sinks take up more visible surface area, you can actually gain storage space underneath.
- Using the space under the sink for storage is another way to save space, as suggested by Homenish.
- Install pull-out cabinet organizers or slide-out trays to fully utilize all the available space.
- Store lesser-used items like spare sponges, cleaning supplies, and trash bags under the sink.
Maximize every inch, including the out-of-sight areas beneath your new sink.
5. Choose a Wall-Mount Faucet
Selecting a wall-mounted faucet rather than a deck-mounted faucet will also give you some extra room.
- A wall-mounted faucet can save counter space.
- Since wall-mounted faucets are installed behind the sink, they free up several inches of space that would otherwise be occupied.
- Many wall-mounted faucets also feature pull-down sprayer heads for added functionality.
Free up precious counter real estate by moving the faucet off the countertop.
6. Optimize Your Sink Accessories
The items you place around your sink, like drying racks, soap dispensers, and sponges, can also be optimized for space.
- Look for a drying rack or roll-up dish rack that can fit right over the sink when in use.
- When not in use, it rolls or folds up out of the way.
- Install the soap dispenser right on the faucet to save space.
- Opt for a small brush holder that mounts to the side of the sink for sponges and scrub brushes.
When choosing accessories, keep size and space limitations in mind for each selection.
7. Add Removable Cutting Boards
For extra counter space when you need it, look for a removable cutting board or prep board that fits right over the top of the sink.
- These boards create additional workspace when lowered over the basin.
- When the sink needs to be used, simply lift the board off.
- Choose a board that is made of lightweight but durable plastic or bamboo.
- Wood boards are not recommended as they can warp over time when exposed to moisture.
This easy add-on provides a usable surface without sacrificing your clean-up area.
8. Install the Right Cabinet
Be sure that the existing cabinetry is properly sized and configured for your new farmhouse sink. There could be some challenges in installing the farmhouse sink. Look at the data below:
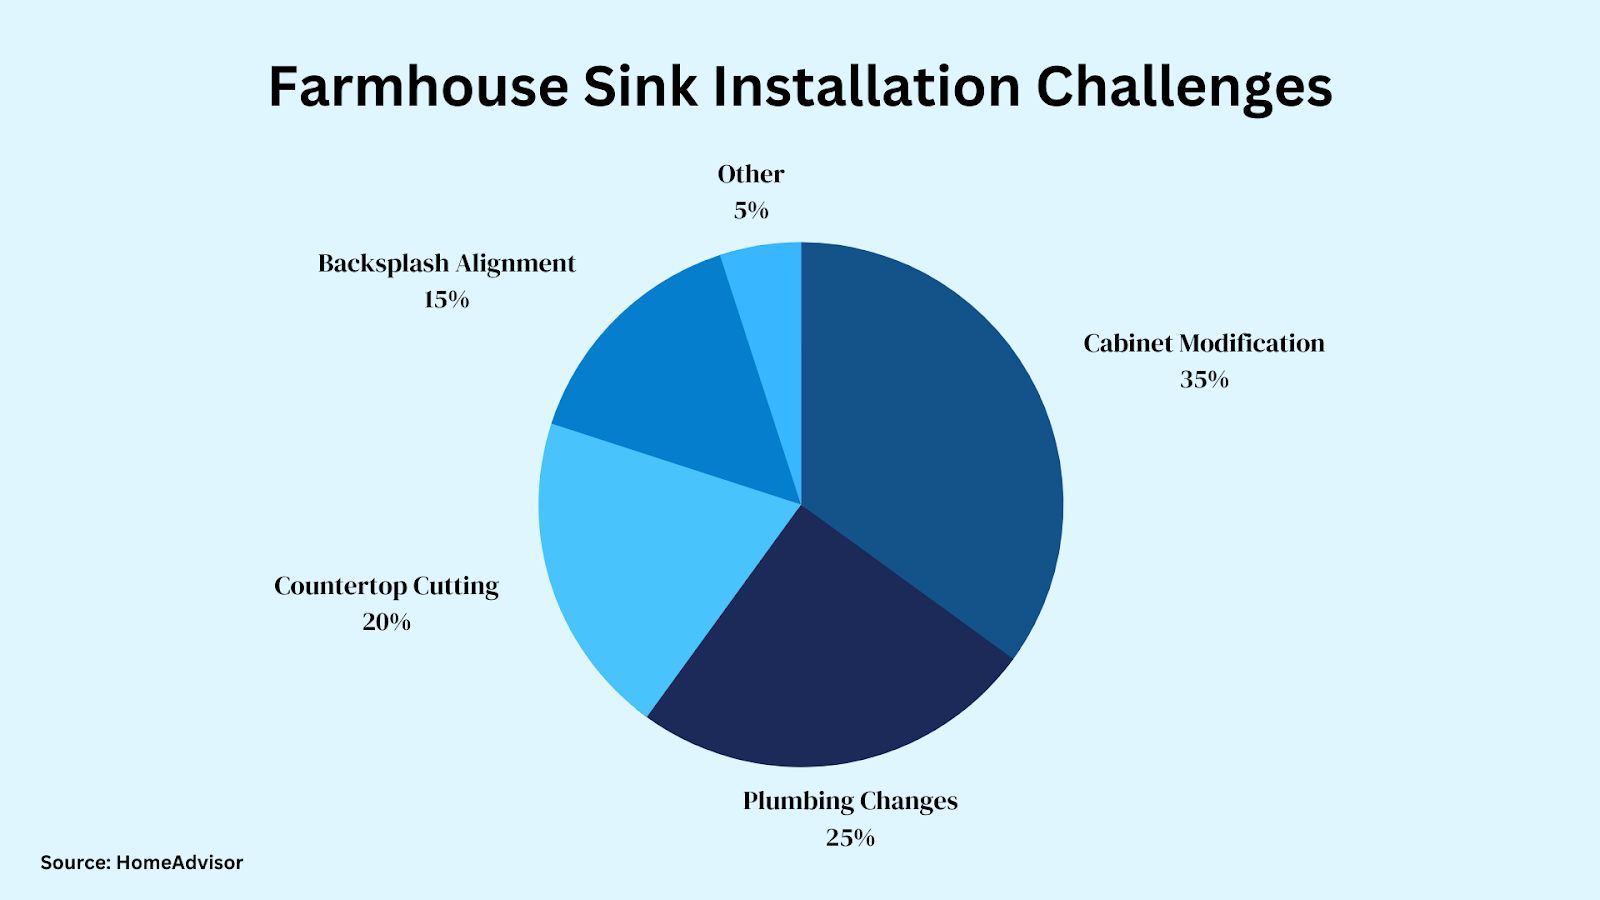
Follow these steps to install the farmhouse sink with ease:
- The sink should fit into the cabinet with just 3 inches of clearance on each side.
- The cabinet may need to be slightly wider than a standard-sized sink base.
- Custom or semi-custom cabinets may be required for an ideal fit.
Taking the cabinetry into account will prevent surprises during installation.
9. Create an Apron Front
If your existing cabinet is not wide enough for a farmhouse sink, you can give it the look by adding a false apron front.
- Have your countertop supplier create the front apron out of the same material to match the sink.
- This will provide the visual of an exposed front without requiring a specialty sink base.
- Attach the false apron front to the cabinet face for a seamless look.
With this DIY apron, you get the farmhouse style without using extra space.
10. Adjust Door and Drawer Hardware
To prevent collisions between your sink and cabinet doors or drawers, adjust the hardware accordingly.
- You might need to shift pulls and knobs to one side to ensure proper movement.
- Look for hardware that mounts on the outside of the door or drawer to provide adequate clearance.
- Hardware with pull-out or drop-down mechanisms can clear the sink when opened.
Adequate hardware adjustments will ensure full access to storage areas.
11. Allow Space for Backsplash and Fixtures
When determining the measurements for your new sink, make sure to account for the additional backsplash and fixtures.
- Allow for 3-6 inches behind and around the sink basin for the backsplash tile.
- Make sure any fixtures like soap dispensers, filters, and drains will mount comfortably without interfering with backsplash tiles.
- Mark the measurements on the wall with painter’s tape to visualize the full footprint before installing.
Careful planning will prevent clearance issues and mistakes.
12. Consider an Integrated Drainboard
To maximize space around the sink perimeter, select a model with an integrated drainboard.
- Many farmhouse sinks are available with slightly angled drainboards built into the basin.
- This provides a sloped drying space without requiring external dish racks or mats.
- Models with two integrated drainboard sides provide the most drying capacity.
The built-in drainboard allows for washing and drying in one streamlined sink.
13. Install a Sink Front
Some homeowners install a sink front panel that matches their cabinetry for a streamlined built-in look.
- When paired with a wall-mounted faucet, the sink front removes any visible counter gaps.
- DIY’ers can cut and attach a panel made of wood or composite board for an integrated look.
- There will still be space to wipe down and utilize the countertop behind the panel.
This approach will deliver a high-end custom appearance in even the smallest kitchen.
14. Choose an Offset Drain Position
An offset drain position is a smart space-saving choice for smaller sink basins.
- Opt for a drain that’s shifted toward the back of the sink instead of centered.
- This will leave more usable counter space in front of the basin for meal prep.
- It also accommodates slightly larger sinks that require the drain to be positioned off-center.
Carefully selecting the drain placement maximizes your available counter space.
15. Evaluate Your Plumbing
When replacing your existing kitchen sink with a farmhouse version, your existing plumbing may need to be adapted.
- The existing drain position likely doesn’t match that of the new sink.
- Supply lines may also need to be extended depending on the new sink placement.
- A professional plumber can modify drain and supply lines to work properly with your unique space and sink.
Addressing plumbing needs ahead of time prevents headaches down the road.
Conclusion
The key to successfully adding a farmhouse sink to a tiny kitchen is thoughtful planning and strategic space-saving solutions. Accurately measuring your existing space, selecting size-conscious styles and accessories, and creatively utilizing every inch will allow you to join the farmhouse sink trend, even with limited room. With an optimized layout and multi-functional furnishings, you can enjoy vintage farmhouse charm within a petite kitchen footprint.
Frequently Asked Questions
What are the standard farmhouse sink dimensions?
The average size of a farmhouse sink is 30 inches wide and 20 inches deep. Smaller and larger size options are also available.
How do I choose the right size farmhouse sink?
Carefully measure your existing sink cabinet space, allowing for 3 inches of clearance on each side. Select a sink in a size that fits within those dimensions. An ideal farmhouse sink should maximize basin size while still fitting in the allotted space.
Can I install a farmhouse sink in my existing cabinet?
In many cases, yes. You may need to make minor modifications to the cabinet front for proper fit and plumbing. Custom sink base cabinets in larger sizes may be needed depending on your current cabinetry.